Featured Listings Management
Adding a new featured listing using our REALTOR® software is a streamlined process designed to help real estate professionals effectively showcase properties with comprehensive and detailed information. Here’s a step-by-step guide on how to add a new featured listing in the admin of the software, utilizing various data fields to ensure your listing stands out in the market.

STEP 1 Please follow these steps to login to EstateVue, and manage your featured listings.
- Login to your client instance at EstateVue. If you do not know your login path, please reach out to us: [email protected]
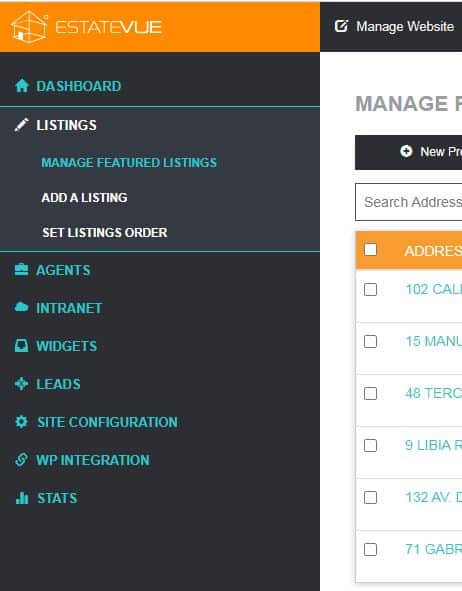
- Once logged in, please click the manage featured listings tab under “listings” on the left:
From this interface you can change everything related to your listings.
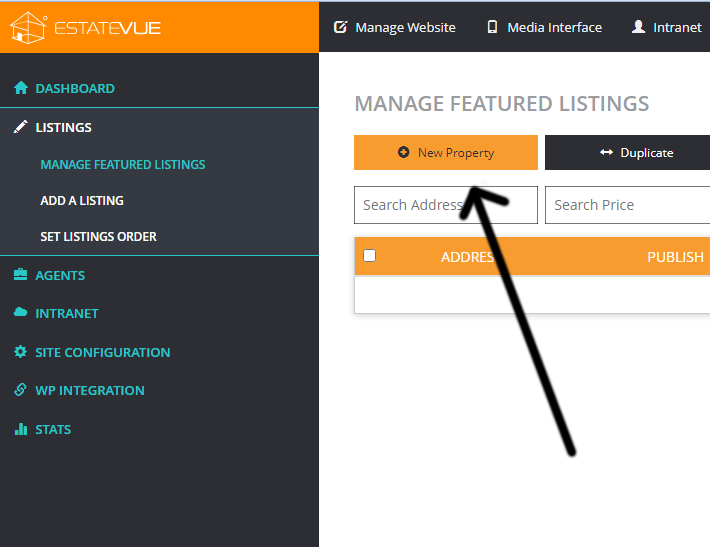
STEP 2 – To add a new listing, start the process by clicking the New Property Icon.
STEP 3 – Filling in the Details
1. Access the Admin Dashboard
Begin by logging into your software’s admin dashboard. Navigate to the “Listings” section and select the option to add a new listing.
2. Basic Property Information
MLS #: Enter the MLS number associated with the property. This ensures the listing is easily identifiable and searchable.
Property Type: Choose from options such as Residential, Commercial, or Rental. This categorization helps in targeting the right audience.
Property Style: Specify the style of the property, such as Single-Family Home, Condo, or Apartment, to give potential buyers a clear understanding of the property’s structure.
Property Ownership: Indicate whether the property is freehold, leasehold, or co-op.
Listing Status: Set the current status of the listing, such as Active, Pending, or Sold, to reflect its availability.
3. Location Details
Address: Input the complete address, including Street #, Street Name, Street Suffix, Unit # (if applicable), Subarea, City, Province/State, Country, and Postal/Zip Code. This information ensures potential buyers can locate the property easily.
General Description/Remarks: Provide a compelling description of the property, highlighting its unique features, recent upgrades, or anything else that makes it stand out.
4. Building Specifications
Finished Interior Area: Specify the total finished interior space (e.g., 3372 sqft) to give buyers a sense of the property’s size.
Unfinished Interior Area: Include any unfinished areas, such as basements or attics, that add value to the property.
Exterior Finish: Choose from options like Brick, Vinyl, or Stone to describe the exterior material.
Year Built: Enter the year the property was constructed to provide context on its age and potential need for updates.
5. Property Features
Foundation: Specify the type of foundation, such as Concrete or Block.
Basement: Indicate whether the property has a basement and its development status (e.g., Finished, Unfinished).
Roof Type: Choose from Asphalt Shingle, Metal, or other available options.
Flooring: Select the types of flooring in the property, such as Hardwood, Carpet, or Laminate.
Fireplace: If applicable, specify the type of fireplace (e.g., Gas, Wood Stove) and the fuel it uses (e.g., Natural Gas, Wood).
6. Parking and Construction
Total Parking: Indicate the total number of parking spaces available.
Covered Parking: If the property has covered parking, specify the number of spots.
Parking Type: Choose from options like Garage, Carport, or Underground Parking.
Construction Type: Describe the building’s construction, such as Frame, Steel/Concrete, or Log.
7. Heating and Utilities
Heating Type: Specify the heating system in place, such as Forced Air, Radiant Heat, or Geothermal.
Heating Fuel: Indicate the type of fuel used, such as Natural Gas, Electric, or Solar.
Equipment Included: Check off any equipment included with the property, such as Air Conditioner, Dishwasher, or Security System.
8. Rental and Commercial Details (if applicable)
Rental Type: For rental properties, specify details like the type of rental (e.g., Short-term, Long-term), whether pets are allowed, and if the property is handicap accessible.
Commercial Type: For commercial properties, enter relevant details like Current Usage and Commercial Title.
9. Amenities and Site Influences
Amenities: Check off amenities available at the property, such as a Pool, Exercise Centre, or Secure Parking.
Site Influences: Highlight the property’s surroundings, such as its proximity to a Golf Course, Shopping Centre, or Ski Area.
10. Brokerage Information
Brokerage Name, Phone, Email: Enter the details of the brokerage representing the property to ensure clear communication channels.
Brokerage CREA Code: If applicable, include the CREA code for easy reference.
11. Save and Move to the Next Tabs
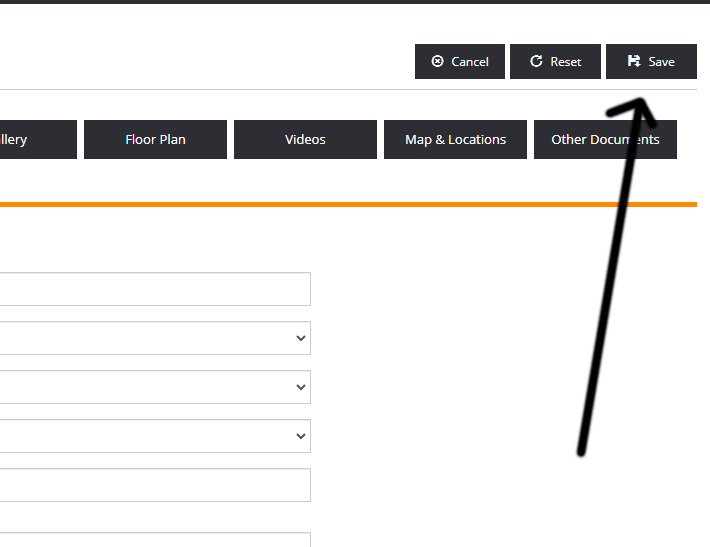
Once all information is entered, save the listing. To feature the listing on your website or within the software, select the “Feature Listing” option. This action will highlight the property, making it more visible to potential buyers.
By carefully populating these fields, you ensure that your featured listing is comprehensive, informative, and appealing, increasing its chances of attracting the right buyers.
STEP 4. Adding Rich Media
To unlock the very detailed information about a listing such as the gallery, slideshow or floorplan you must save the listing. Only the General, Property Details, and Optional Details tabs are available during the initial setup.
STEP 4. Saving and Publishing
To unlock the very detailed information about a listing such as the gallery, slideshow or floorplan you must save the listing. Only the General, Property Details, and Optional Details tabs are available during the initial setup.


 Mon-Fri: 8:30-5:00
 #7 3185 Via Centrale, Kelowna BC


